![VMC logo.svg]](https://support.viewmychain.com/hubfs/VMC%20logo.svg)
The Process - How to do it
There are three ways to access ViewMyChain from Reapit:
- Via the ‘Sales Progress' link in your Reapit offer screen. This is likely to be the primary form of access for sales progressors.

-
You can also access VMC from the ‘Apps’ icon displayed in the top menu of the property record.

-
The ’Apps’ menu option in the left toolbar.

VMC Stages - Overview
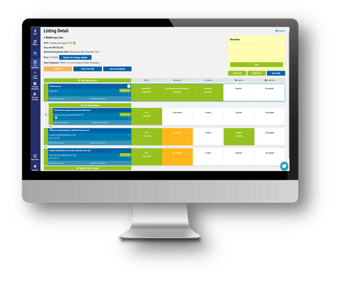
ViewMychain provides you with a complete view of the whole chain and its progress,
allowing you to see everything you need from a single screen.
There are 6 sections which provide the detailed information, and these are detailed in the images below.

Section 1 – Property, Agent and Client Information
From a listing, select the arrow icon to display the property, agent and client information.
Buyer and seller information along with their conveyancers will automatically pull through to VMC when added to Reapit.

To add the staff member or case handler -
- Click 'Add contact' and select the person from the available list (this list will show all the staff members added to the company record stored in Reapit – if the person you need is not displayed, please add the staff member to Reapit first then repeat this process).

- Once selected, the contact details will be displayed.

Note: if the conveyancer is not listed, please contact support@viewmychain.com and our team will add them for you.
Section 2 – SSTC
To access your Reapit sales progression (and additional VMC) milestones, click the ‘SSTC’ section as highlighted below.
ViewMyChain will automatically update the milestone date fields as information is received, you can also update these manually by clicking into the date field box and selecting the appropriate date. Custom checklist items can be created as required.

Please note that your milestones may differ to those displayed.
Section 3 – Searches
ViewMyChain will provide local authority search status updates (where information is available) including date ordered, expected turnaround times and date delivered.
VMC will also provide date delivered for both environmental and water and drainage searches where available. Custom checklist items can be created as required.

Please note that your milestones may differ to those displayed.
Section 4 – Funding
This section will display mortgage-related updates, allow you to mark your buyer as ‘Cash’ (where applicable) and add information on lenders and brokers.
Survey information can also be updated here, including any additional survey requirements. You can also register for mortgage updates, for more information on this, see the next step.

Please note that your milestones may differ to those displayed.
Section 4 – Funding ‘Register for Mortgage Updates’
Experian are one of our data partners and when you register for mortgage updates, they will send VMC a notification when a funding request has hit your customers credit history. This provides a better understanding of where their mortgage application is in the overall process.
To register a customer for mortgage updates, click the section outlined below and complete the registration form.


Note: this does not affect your customers credit history and there is no cost for this service.
Section 5 - Enquiries
Milestone updates will be provided by ViewMyChain where available and can also be updated manually by selecting the date field and entering the appropriate dates. Custom checklist items can be created as required.

Please note that your milestones may differ to those displayed.
Section 6 - Completion
The ‘Completion’ section allows you to record target/preferred, and actual dates for exchange and completion. Adding dates here will help you monitor the progress of your deal and ensure everything is on track to meet your specified dates. Custom checklist items can be created as required.

Please note that your milestones may differ to those displayed.
Adding a Chain Note
Adding notes to your deal is easy to do.
- Click 'chain note' then 'add a note'

- Type your note and remember to tag your note to the relevant property(s), choose one or more from the list available. Tagging your note makes it easier to find notes relating to a specific property in the chain - see the next step.

Chain notes can be tagged to one or more properties making it easier to identify notes for specific properties in your chain.
- In ‘Chain Note’, add your note.

- Under the heading ‘Select properties to tag’, select the applicable properties and click 'Add’.

- The tagged property(s) will display in the note along with a date and time stamp.

No duplication required
All sales progress notes added to ViewMyChain will write-back to your Reapit offer 'activity feed', along with any key milestone, fall-through, and search updates.

Tasks
All tasks created in ViewMyChain are also visible in your Reapit dashboard.
Using tasks allows you to manage and prioritise your workload.

Creating Tasks and Messages
You can create tasks directly from a listing in ViewMyChain, see the images below.
Tasks can be assigned to yourself or colleagues and managed in ViewMyChain or your Reapit dashboard.

Task Management
From the main tool bar, select ‘My Tasks’ as shown below.
Tasks can be managed using the filters and date ranges available to help prioritise your workload. You can also create new tasks from this area.

Split Chains
It doesn’t matter how complex the chain is, even with multiple splits, ViewMyChain can support it and display it in a single-screen view of the whole chain. Split chains are easy to build and allow you to have a single view of the whole chain. Whether two properties are being sold to buy one or one property is being sold with two onward purchases, VMC has it covered.

Breaking the Chain
If your chain breaks, you will need to follow these steps before you can remarket the property and/or add another buyer/chain.
To break the chain:
- Select the ‘Link’ icon between the two properties where the break has occurred.
- A pop-up will appear prompting you to confirm the break. Select ‘Break Link’.


Once the link is removed, the property and associated information will no longer display, and you can now add a new property/buyer to the chain and close the chain when you are ready.
Emailing Clients – ‘Click to Email’
Wherever you see an email address, ViewMyChain allows you to ‘click to email’ – this will open your email window for you to send your message. Note: VMC does not store emails, these will be managed by your current email provider.

Things to Look out for
Fall-through Alerts - Notifications
ViewMyChain will notify you if we detect a potential break in the chain. You will receive an email notification, the property record in ViewMyChain will display a red house icon along with a note a shown below:
Email notification:
 Alert icon:

Property Message:

We will also display a note in your Reapit offer activity feed:

Verifying Fall-throughs
A message is displayed within the property record for you either ‘confirm’ or ‘discard’ the fall-through.
If you confirm the fall through, the property status will update to ‘For Sale’, VMC will remove all previous buyers details and the chain will break.
If you discard, the chain will remain intact and the property status unchanged.


Searching Possible Fall-throughs
- Select 'My Properties'.
- Select 'Advanced'.
- Select 'Possible Fall through' from the 'Status' drop-down.

Locked Properties
If we have been unable to verify an address, it will appear as a locked property.
Every property has a Unique Property Reference Number (UPRN), each property address in ViewMyChain must match the exact address registered with Ordinance Survey. If not, it will show as a ‘locked property’.
You can identify a 'Locked Property' by the padlock icon.

How to Unlock a Property
- Select the property that you wish to unlock, enter the postcode and select 'Search'.

- Choose the address that best matches your property from the drop-down list.

- Select 'Verify' and this will unlock the property. Any chain information or milestone updates will update overnight and be available to view the following morning.

Searching Locked Properties
- Select 'My Properties'.
- Select 'Advanced search'.
- From the 'Status' drop-down, select 'Locked Properties’.

Unverified Chain Links
Unverified chain links are created when SSTC properties cannot be fully identified as being sold. The address may have matched but the agent information is unavailable.
These are displayed in ViewMyChain with a grey background – see image 1.
To verify the chain link:
- Select the listing - a pop-up will appear prompting you to verify the unverified chain link.

- Select 'Verify' to confirm or 'Remove' to remove the link.

This completes the end-to-end process for using ViewMyChain. We are excited for you to experience how ViewMyChain will revolutionise your sales progression transactions, allowing you to put your focus back into servicing your clients.
For any 'how do I?' questions you might have with regards to specific VMC features, please refer to our 'How to' articles, or contact our support team.